Built like hardware.
Not like an app.
Every button, knob, and indicator on Knob16 has a job. This manual walks the surface sheet by sheet — what each control is, and why it is there.
- Knob with a dot
Sets a value. Turn it — CC number, channel, range, root note.
- Row of knobs without dots
A selector. Tap one option in the row; the lit ring marks the choice.
- Single knob without a dot
A button. One tap does one thing — opens a setting, flips an option, or confirms.

One surface your hands can learn.
The control surface: sixteen knobs, four banks, one fixed layout.
- 01Preset selectorSwitch setups, keep your workflow
Change instruments or projects without rebuilding the surface.
- 02MIDI statusKnow when your rig is ready
A green light confirms the destination is connected before you touch a knob. With Ableton Live it turns blue and reads LIVE.
- 03Bank selector | Shift64 controls. 16 at a time.
Arrows step through four banks. Hold the active bank button to switch modes; tap it to exit a menu.
- 04Double-tapFine-tune or MIDI Learn
Double-tapping a knob toggles fine-tune or starts MIDI Learn, depending on what is chosen in Mode Select. A white cap, like Drive here, marks a knob in fine-tune.
- 05Snapshot slotsReturn to saved states in one tap
Four slots recall complete performance states instantly.

Hold one control. Change the machine.
Hold the active bank button and the grid becomes Mode Select. Tap a mode to switch the layout.
- 01HOLDthe active bank
- 02TAPa mode while holding
- 03RELEASEback to the surface
TIPTap the active bank to exit a menu or configuration and return to the surface.
Banks. One color per bank — the same in Control and Play.
Menus & configs. Red inside Control, green inside Play.
Live mode. Cyan marks Live mode. Bank 4 still mirrors what Live shows, but its bank color is blue. Shift names the layout instead of a bank number.
- 01Active bankHold to open Mode Select
Keep a finger on the bank button between the arrows and tap a mode below. Release it to return to the surface.
- 02ControlThe lit ring marks the mode you are in
While you hold the bank button, the ring shows the mode you came from — here Control, the surface from the previous sheet. Release to go back to it, or tap another mode to switch.
- 03PlayTurn controls into notes
The grid becomes a playable note surface.
- 04EditGive each knob its own job
Open per-knob settings — message type, range, precision, and name. See the next sheet.
- 05GroupEnter group mode
Link knobs so one lead moves many — see the group sheets. In Play mode this slot becomes Pad, for note and expression settings.
- 06Double-tapChoose what a double-tap does
Tap to switch a knob double-tap between Fine-tune and MIDI Learn. The label shows the current choice.
- 07DragSet how every knob feels under your finger
Global drag sensitivity for all knobs, plus an option to invert the vertical direction.
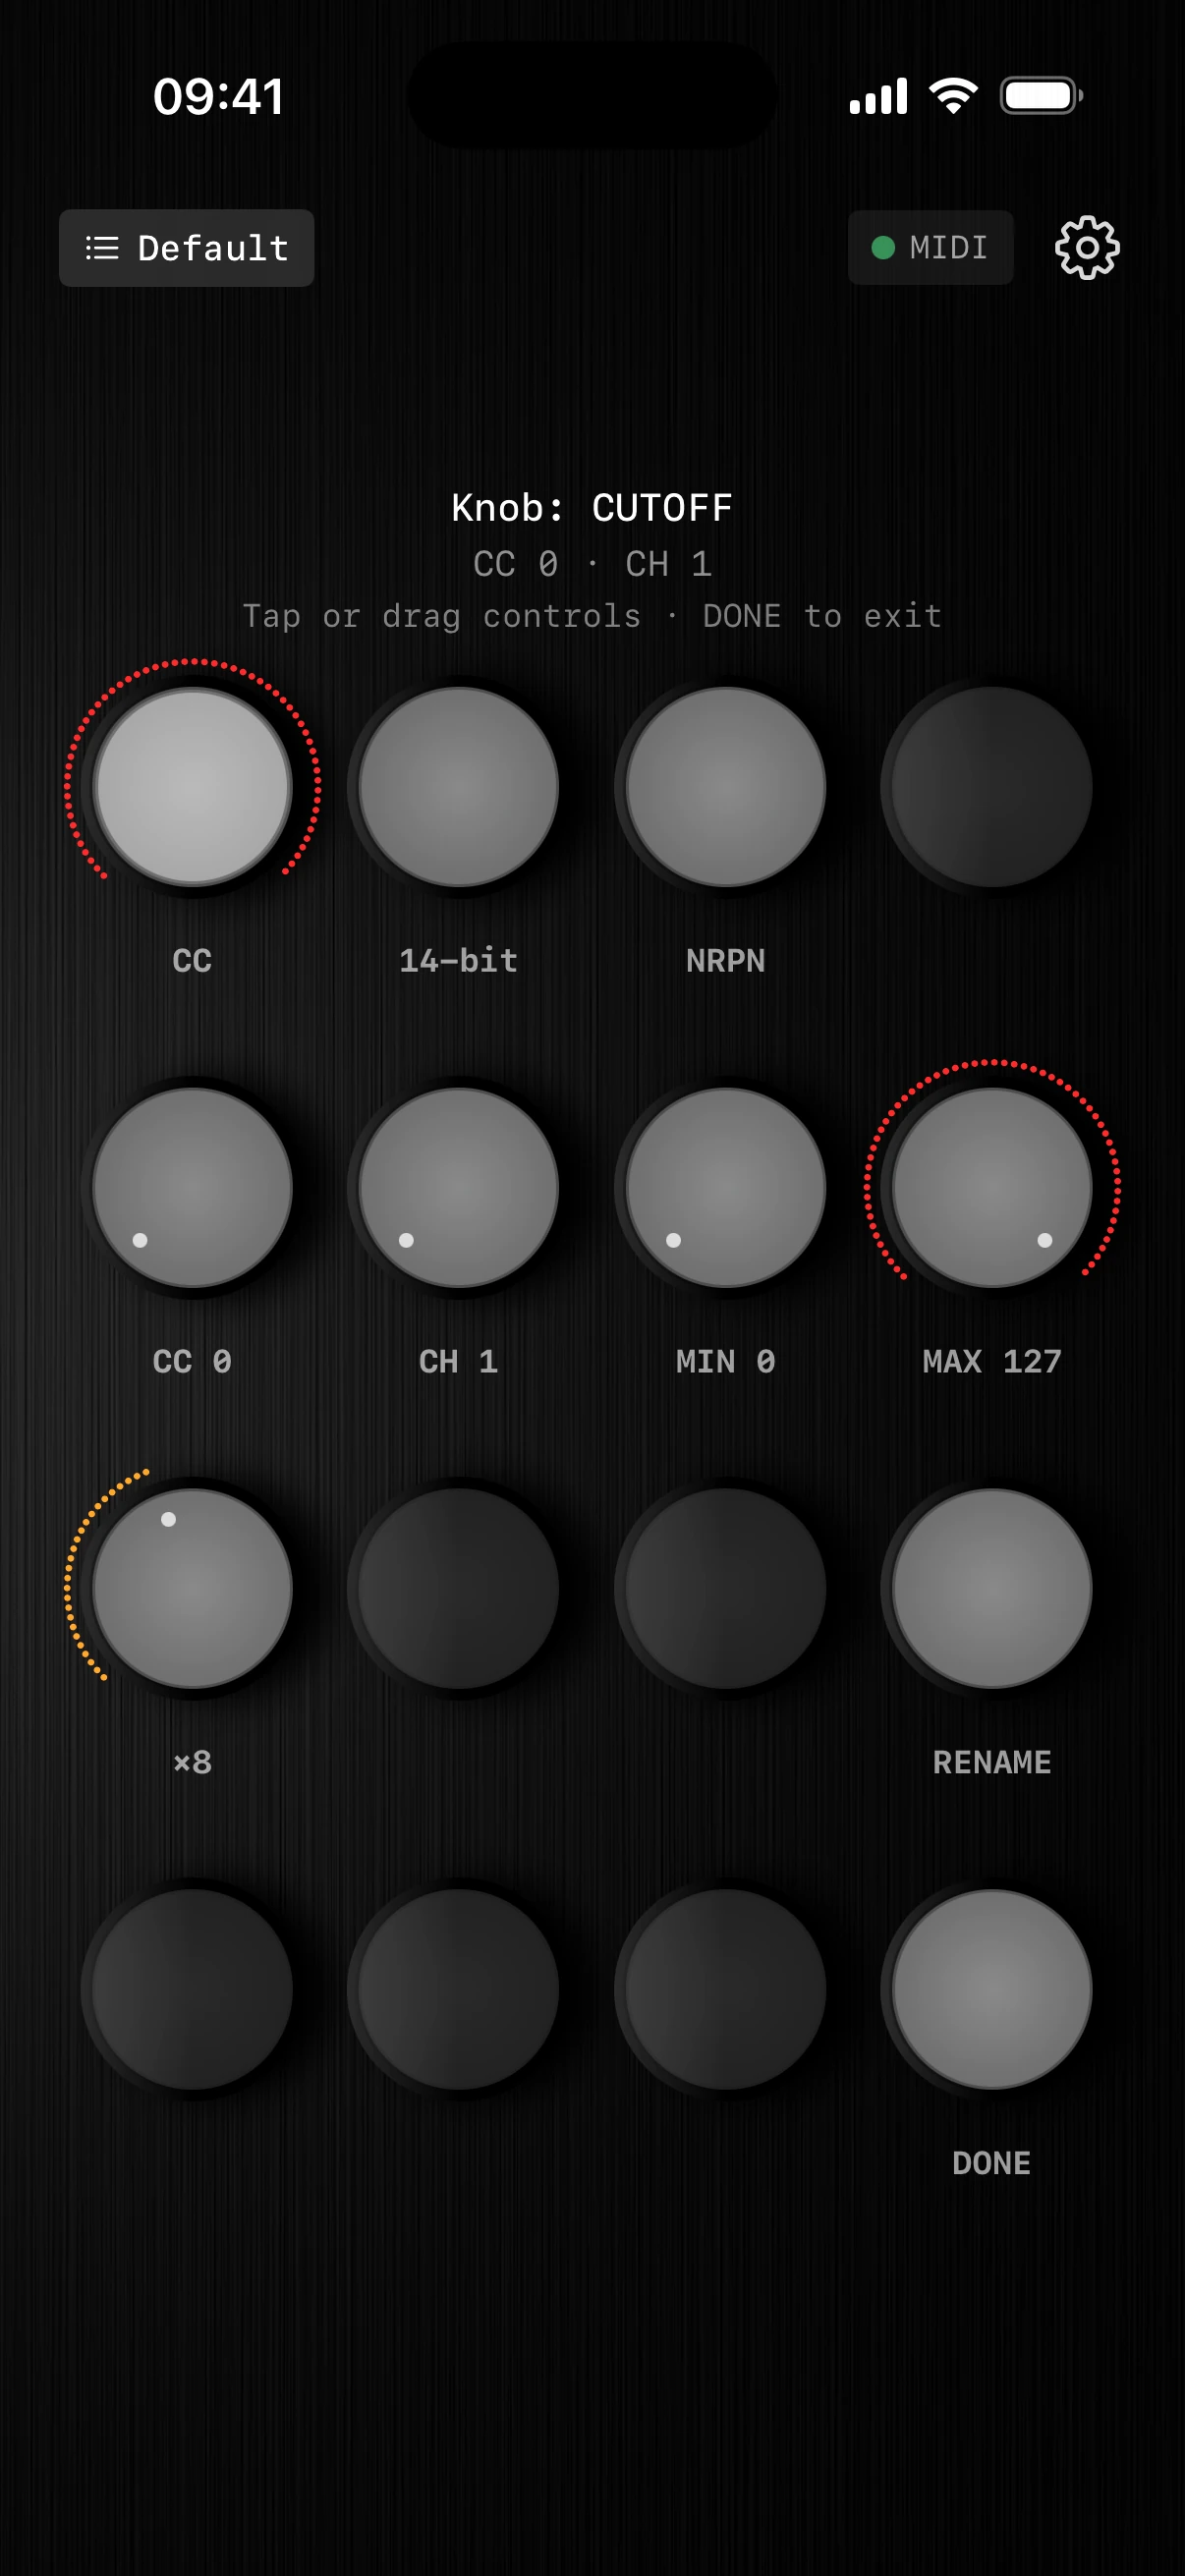
Every control has a job.
Configure behavior, range, precision, and identity — per knob.
- 01Type · CCControl almost any MIDI target
Standard MIDI CC works with nearly every device and DAW.
- 02Type · 14-bitMake fine movement feel continuous
Smoother motion for parameters that respond to small value changes.
- 03Type · NRPNGo beyond standard CC mapping
Reach high-resolution and manufacturer-specific parameters.
- 04CC numberChoose exactly what this knob moves
Point the control at the exact destination parameter.
- 05MIDI channelControl several devices without collisions
Keep each instrument independently addressable.
- 06Min / MaxKeep gestures inside the useful range
Restrict movement to a musical — or safe — window.
- 07Fine factorSlow down when precision matters
Set per knob: fine-tune mode moves this control ×8 slower, without giving up its full range.
- 08RenameCall it Cutoff, Drive, Space — anything
Replace protocol language with a label that means something.
- 09DoneConfigure it, then keep playing
Return straight to the same familiar surface.

One knob can move many.
Link knobs into color-coded groups. Each group has one lead and any number of followers, each with its own curve.
- 01TAPassign a group
- 02LONG PRESSmake it the lead
- 03SWIPE UPchange the curve
- 04SWIPE DOWNinvert it
- 01LeadLong-press to change the lead
The first knob in a group leads it. Long-press another knob of the same color to hand it the lead. The lead is the knob you turn; the rest follow.
- 02FollowerTap to join a group
Tap a knob to assign it to a group — its ring takes the group’s color.
- 03Curve · LIN / EXP / LOGSwipe up to change the curve
Linear, exponential, or logarithmic — how the follower responds as the lead turns.
- 04Inverted · −LINSwipe down to invert
A minus sign means the follower moves the opposite way to its lead.
- 05No groupPlain knobs stay independent
A knob without a colored ring is not part of any group.
- 06Group colorsSeveral groups on one bank
Each color is a separate group with its own lead — here red, green, and teal.
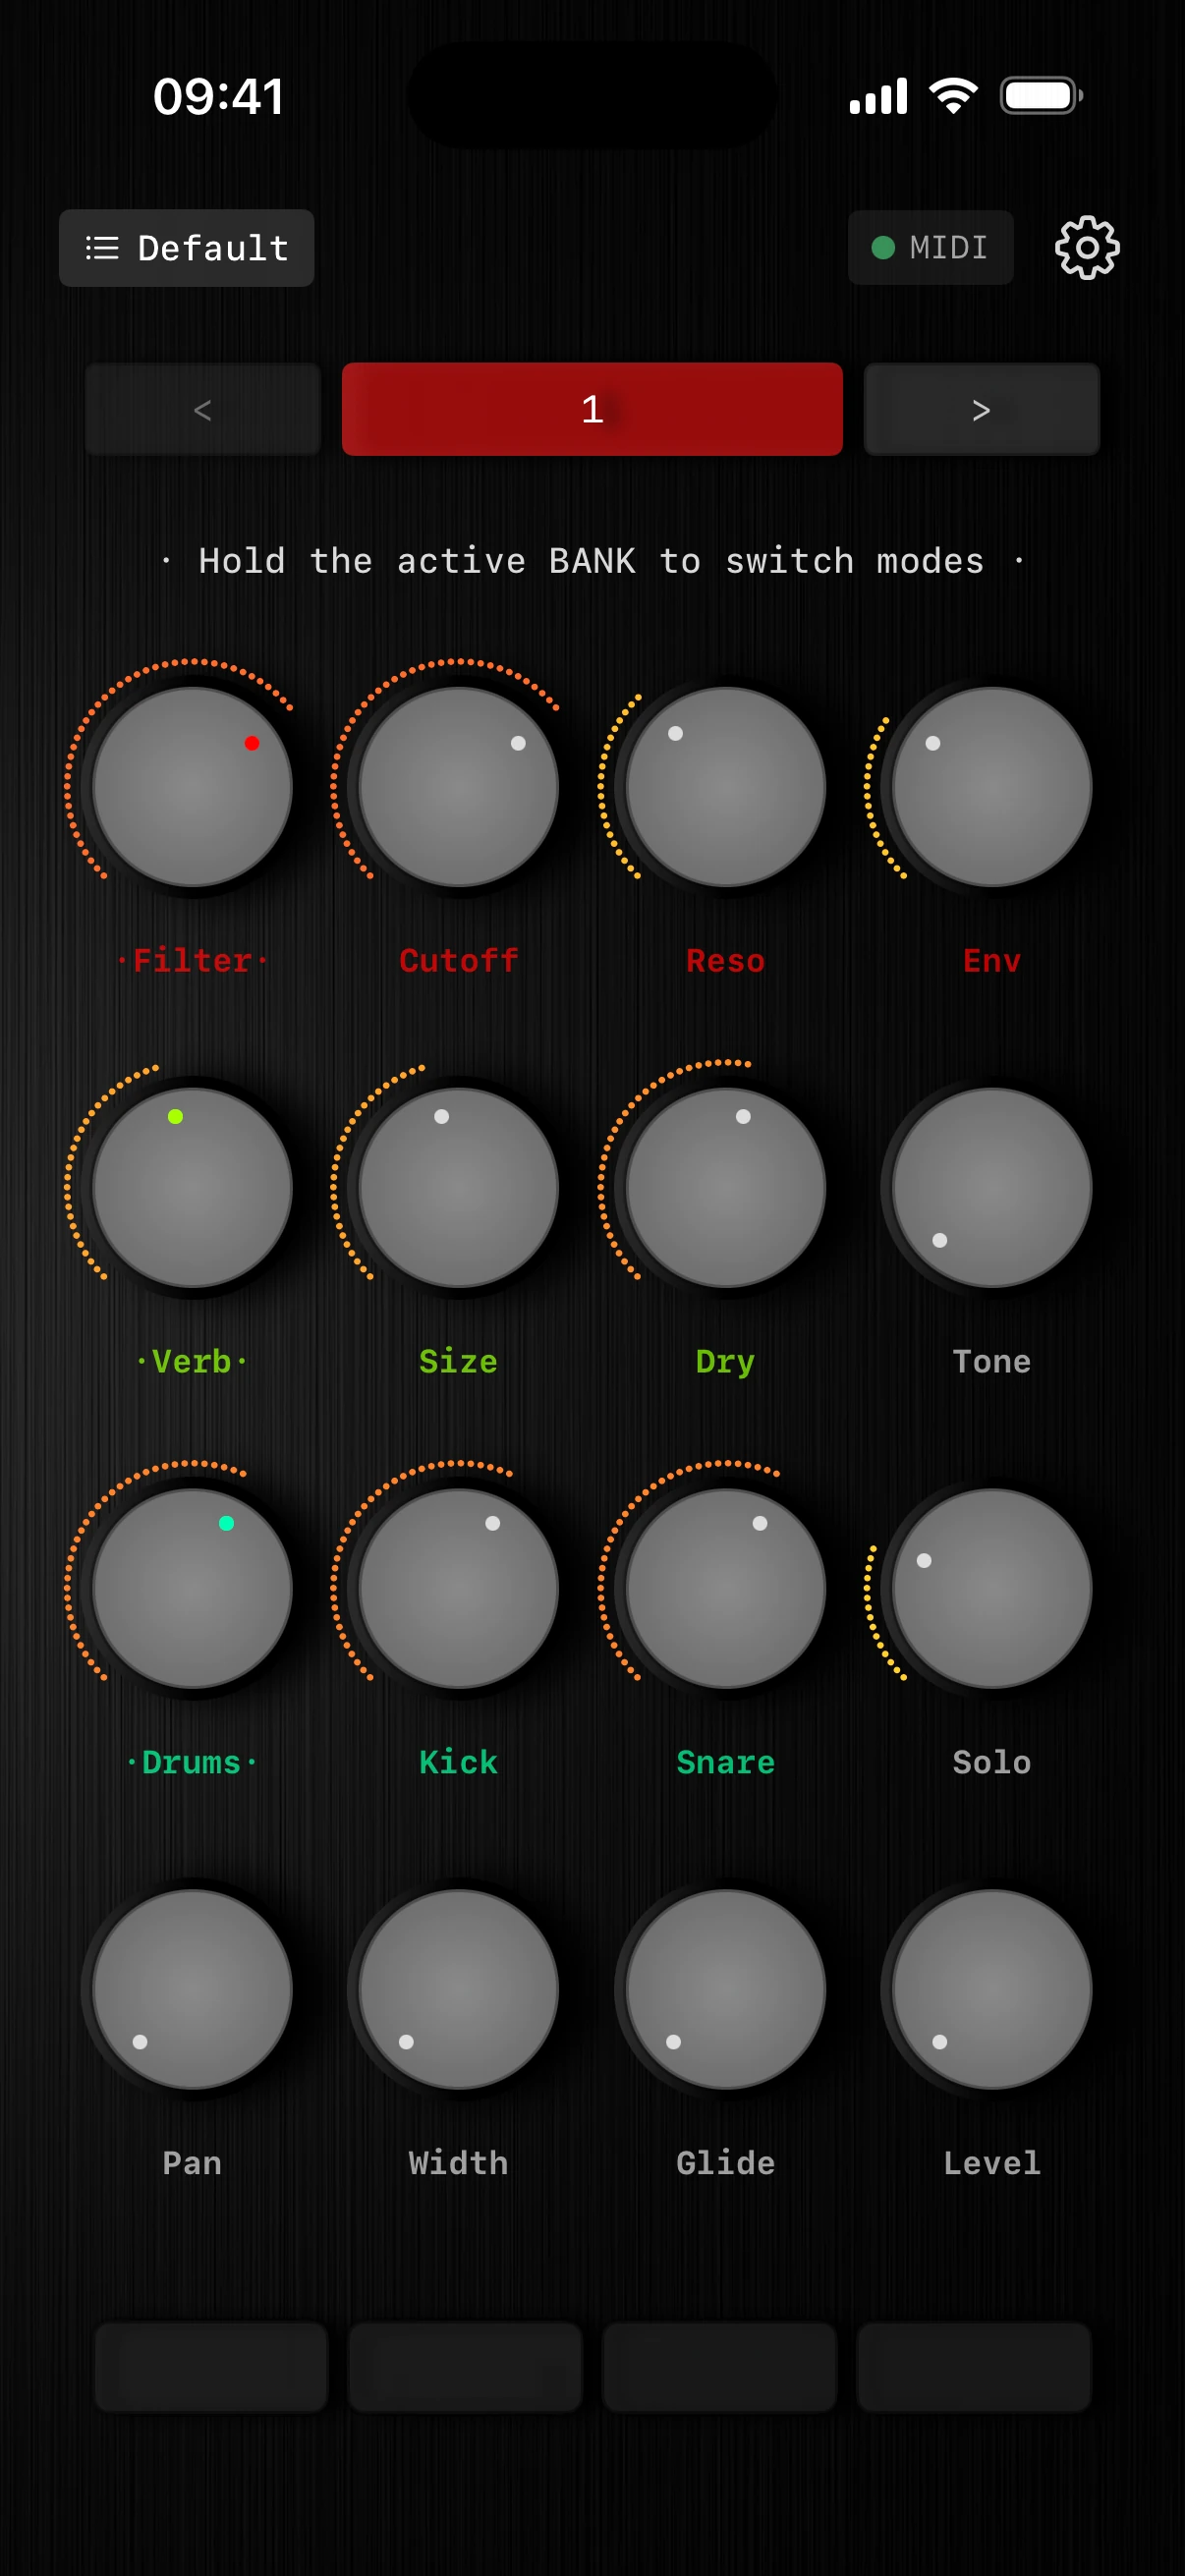
Turn the lead. The group follows.
In group mode, colored names show which knobs move together.
- 01Lead · FilterDots mark the lead
Dots around the name and a colored pointer show which knob leads its group.
- 02FollowerFollowers move along their own curves
Each ring shows the follower’s value, shaped by the curve you gave it.
- 03Group follower · SizeA follower uses its assigned curve
Size follows the green Verb lead with the response set in Group setup.
- 04Ungrouped · PanUngrouped knobs keep their own value
Pan is not in a group, so its name stays gray.
- 05Name colorsThe color tells you the group
Red, green, and teal leads each drive their own followers on the same bank.
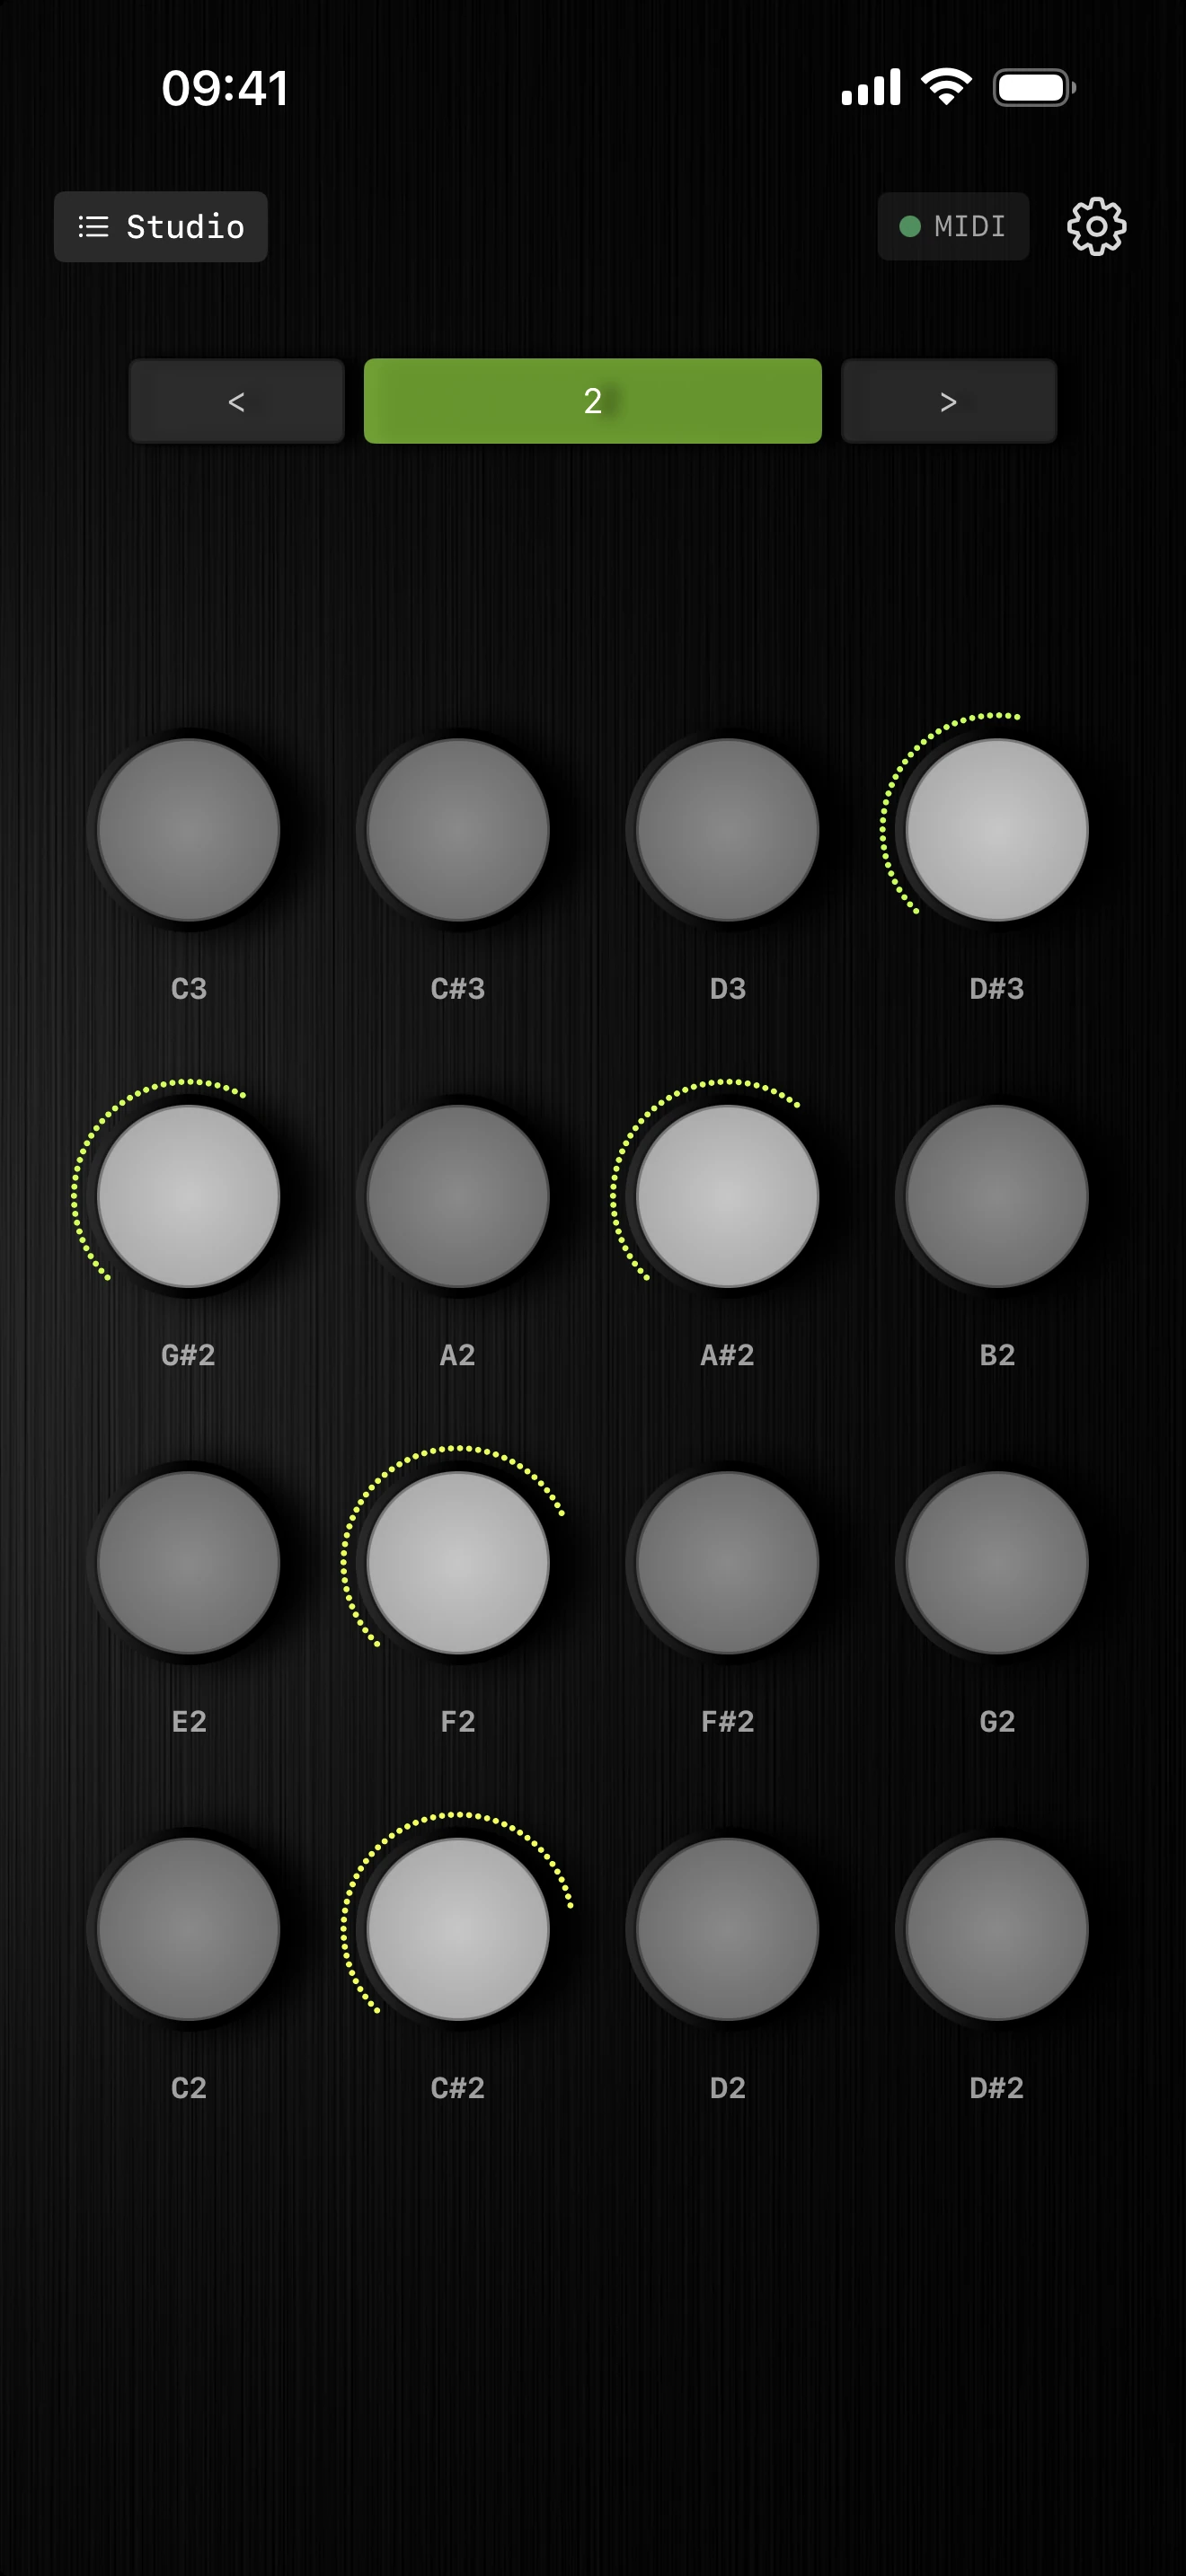
The surface becomes an instrument.
The same 4×4 geometry, now under your fingers.
- 01Bank selectorChange register, keep the geometry
Move between playable ranges without learning a new layout.
- 02Note padsSixteen playable pads per bank
Play melodies and chords on a compact surface.
- 03Note labelsEvery pad identifies itself
Know exactly which note will sound before you touch it.
- 04Row orderLow at the bottom, rising row by row
Pitch climbs from the bottom-left pad to the top-right, like a pad controller.
- 054×4 layoutOne layout for control and performance
The grid never moves, so muscle memory carries across modes.
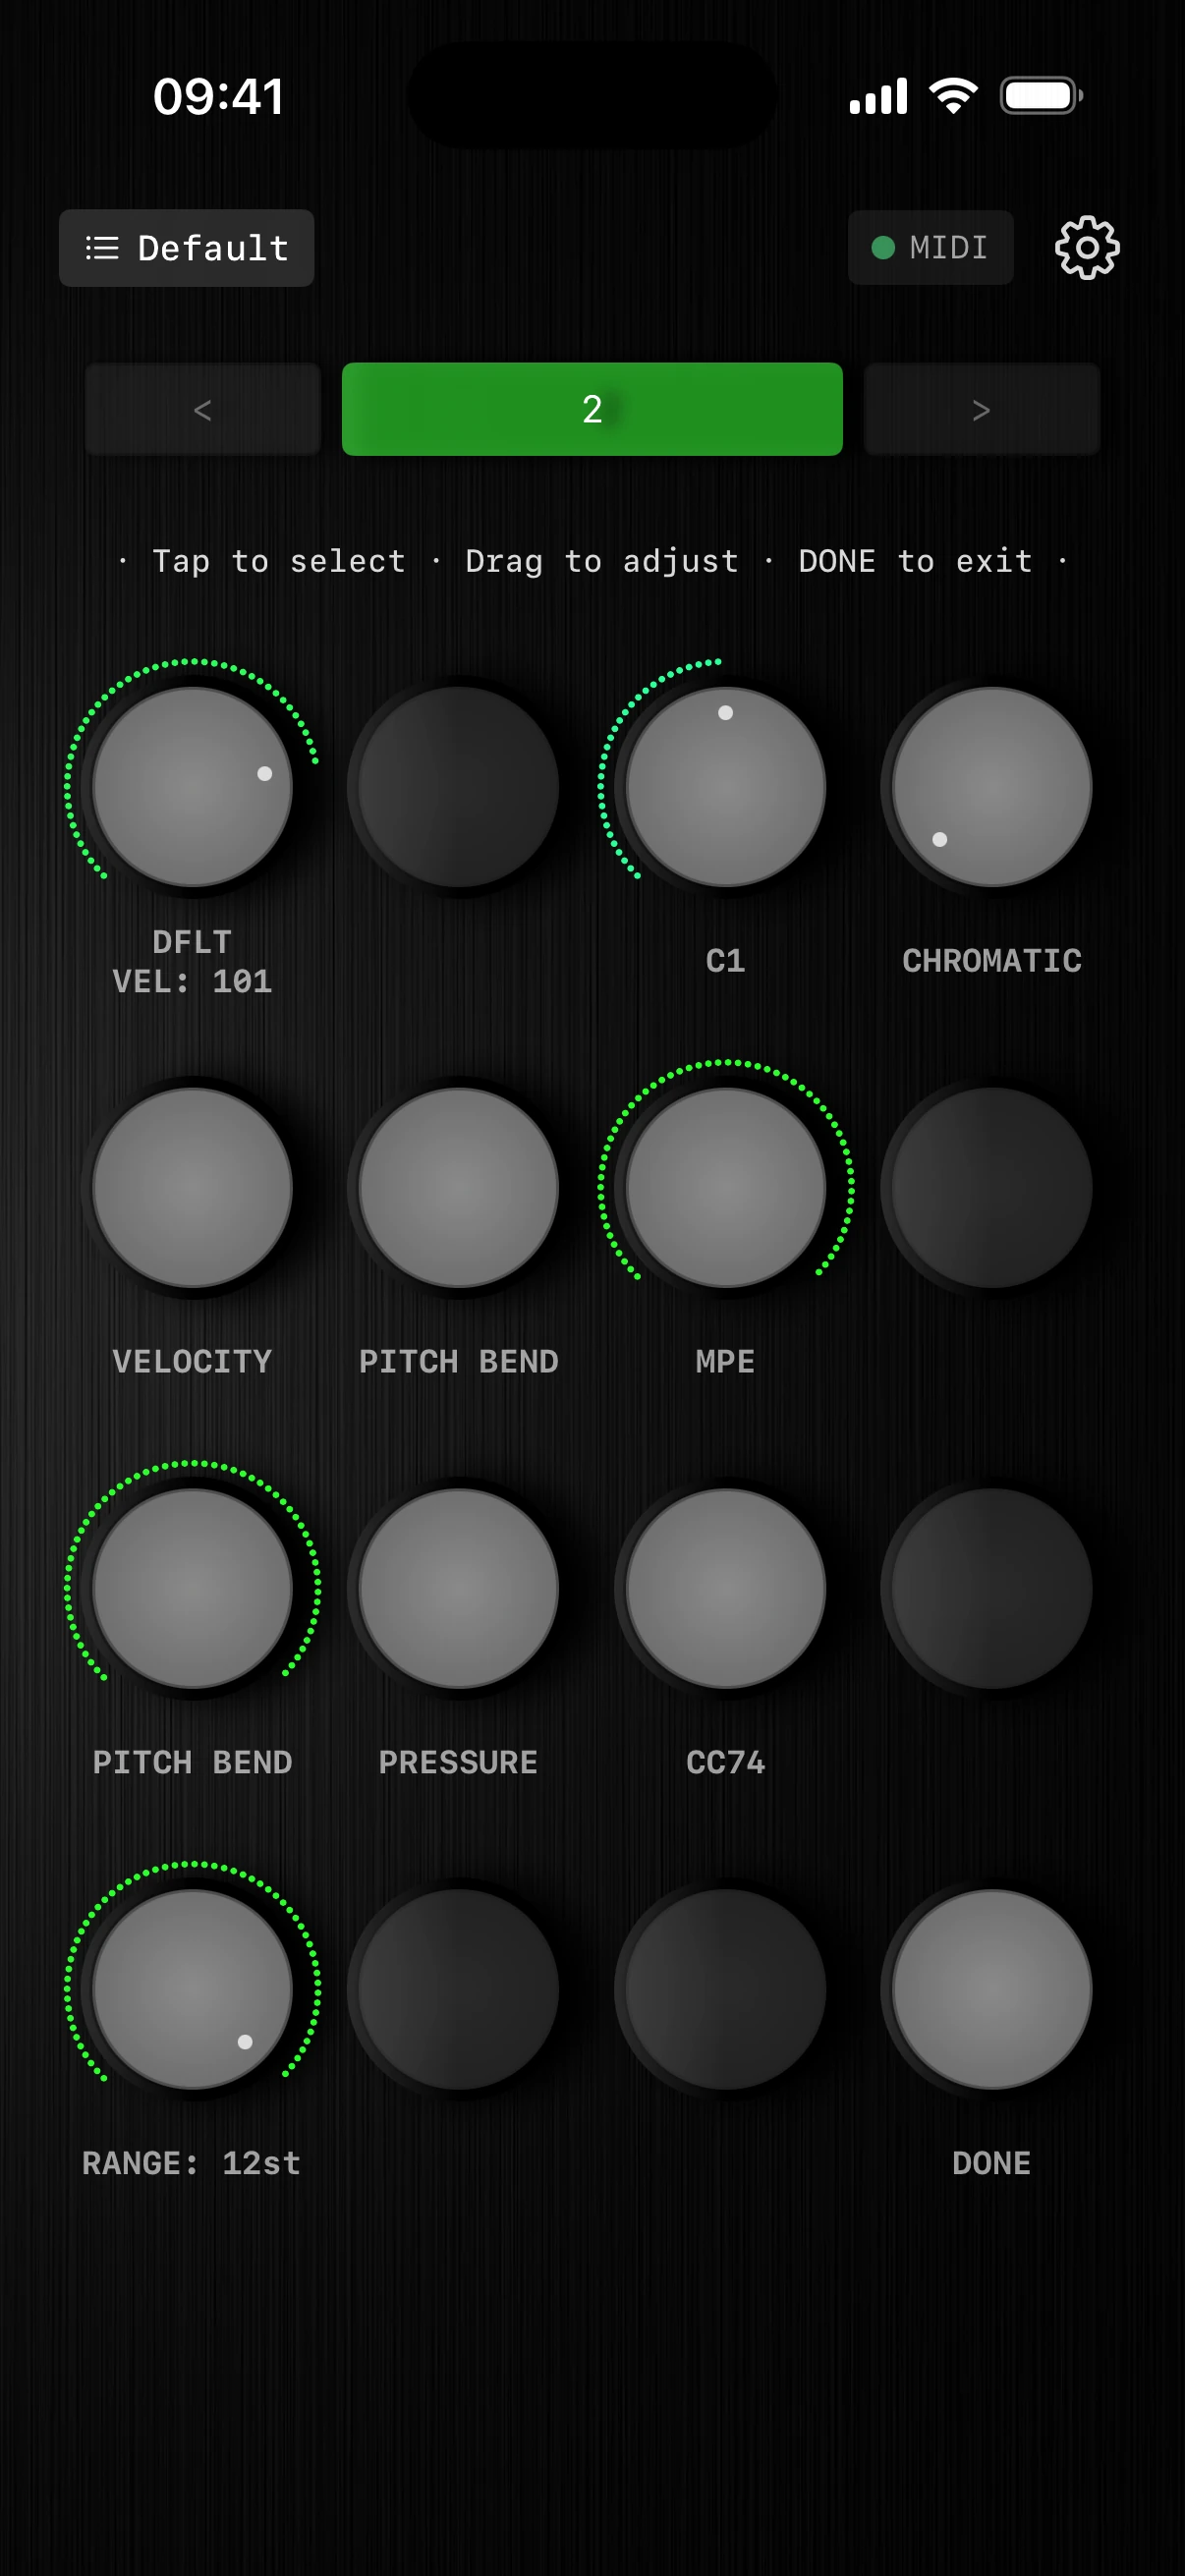
Expression in every touch.
Choose what a vertical drag on a held pad does: velocity, pitch bend for every note, or per-note MPE.
- 01Default velocitySet how hard pads play
Every pad plays at this velocity unless the drag is set to control it.
- 02Root noteStart from the right register
Place the playable range where the music needs it.
- 03ScaleChoose from 29 scales
Keep every pad inside the key the track is written in.
- 04Drag · VelocityDrag to play louder or softer
Keep your finger on the pad and slide up for more velocity, down for less.
- 05Drag · Pitch bendDrag to bend every note
Works like a keyboard’s pitch wheel: the bend moves all notes that are sounding right now.
- 06Drag · MPEShape only the note under your finger
Each finger gets its own expression. Choose what the drag controls in the row below.
- 07MPE · Pitch bendBend just this note
Keep your finger on the pad and slide up to bend the pitch up, down to bend it down.
- 08MPE · PressureSwell just this note
Keep your finger on the pad and slide up to add pressure, down to ease off.
- 09MPE · CC74Shape the tone of just this note
Keep your finger on the pad and slide up to brighten the sound, down to darken it.
- 10Bend rangeChoose a precise or dramatic bend
Match the gesture to subtle inflection or wide movement.
- 11DoneSet it once, then perform
Return to the playable surface immediately.
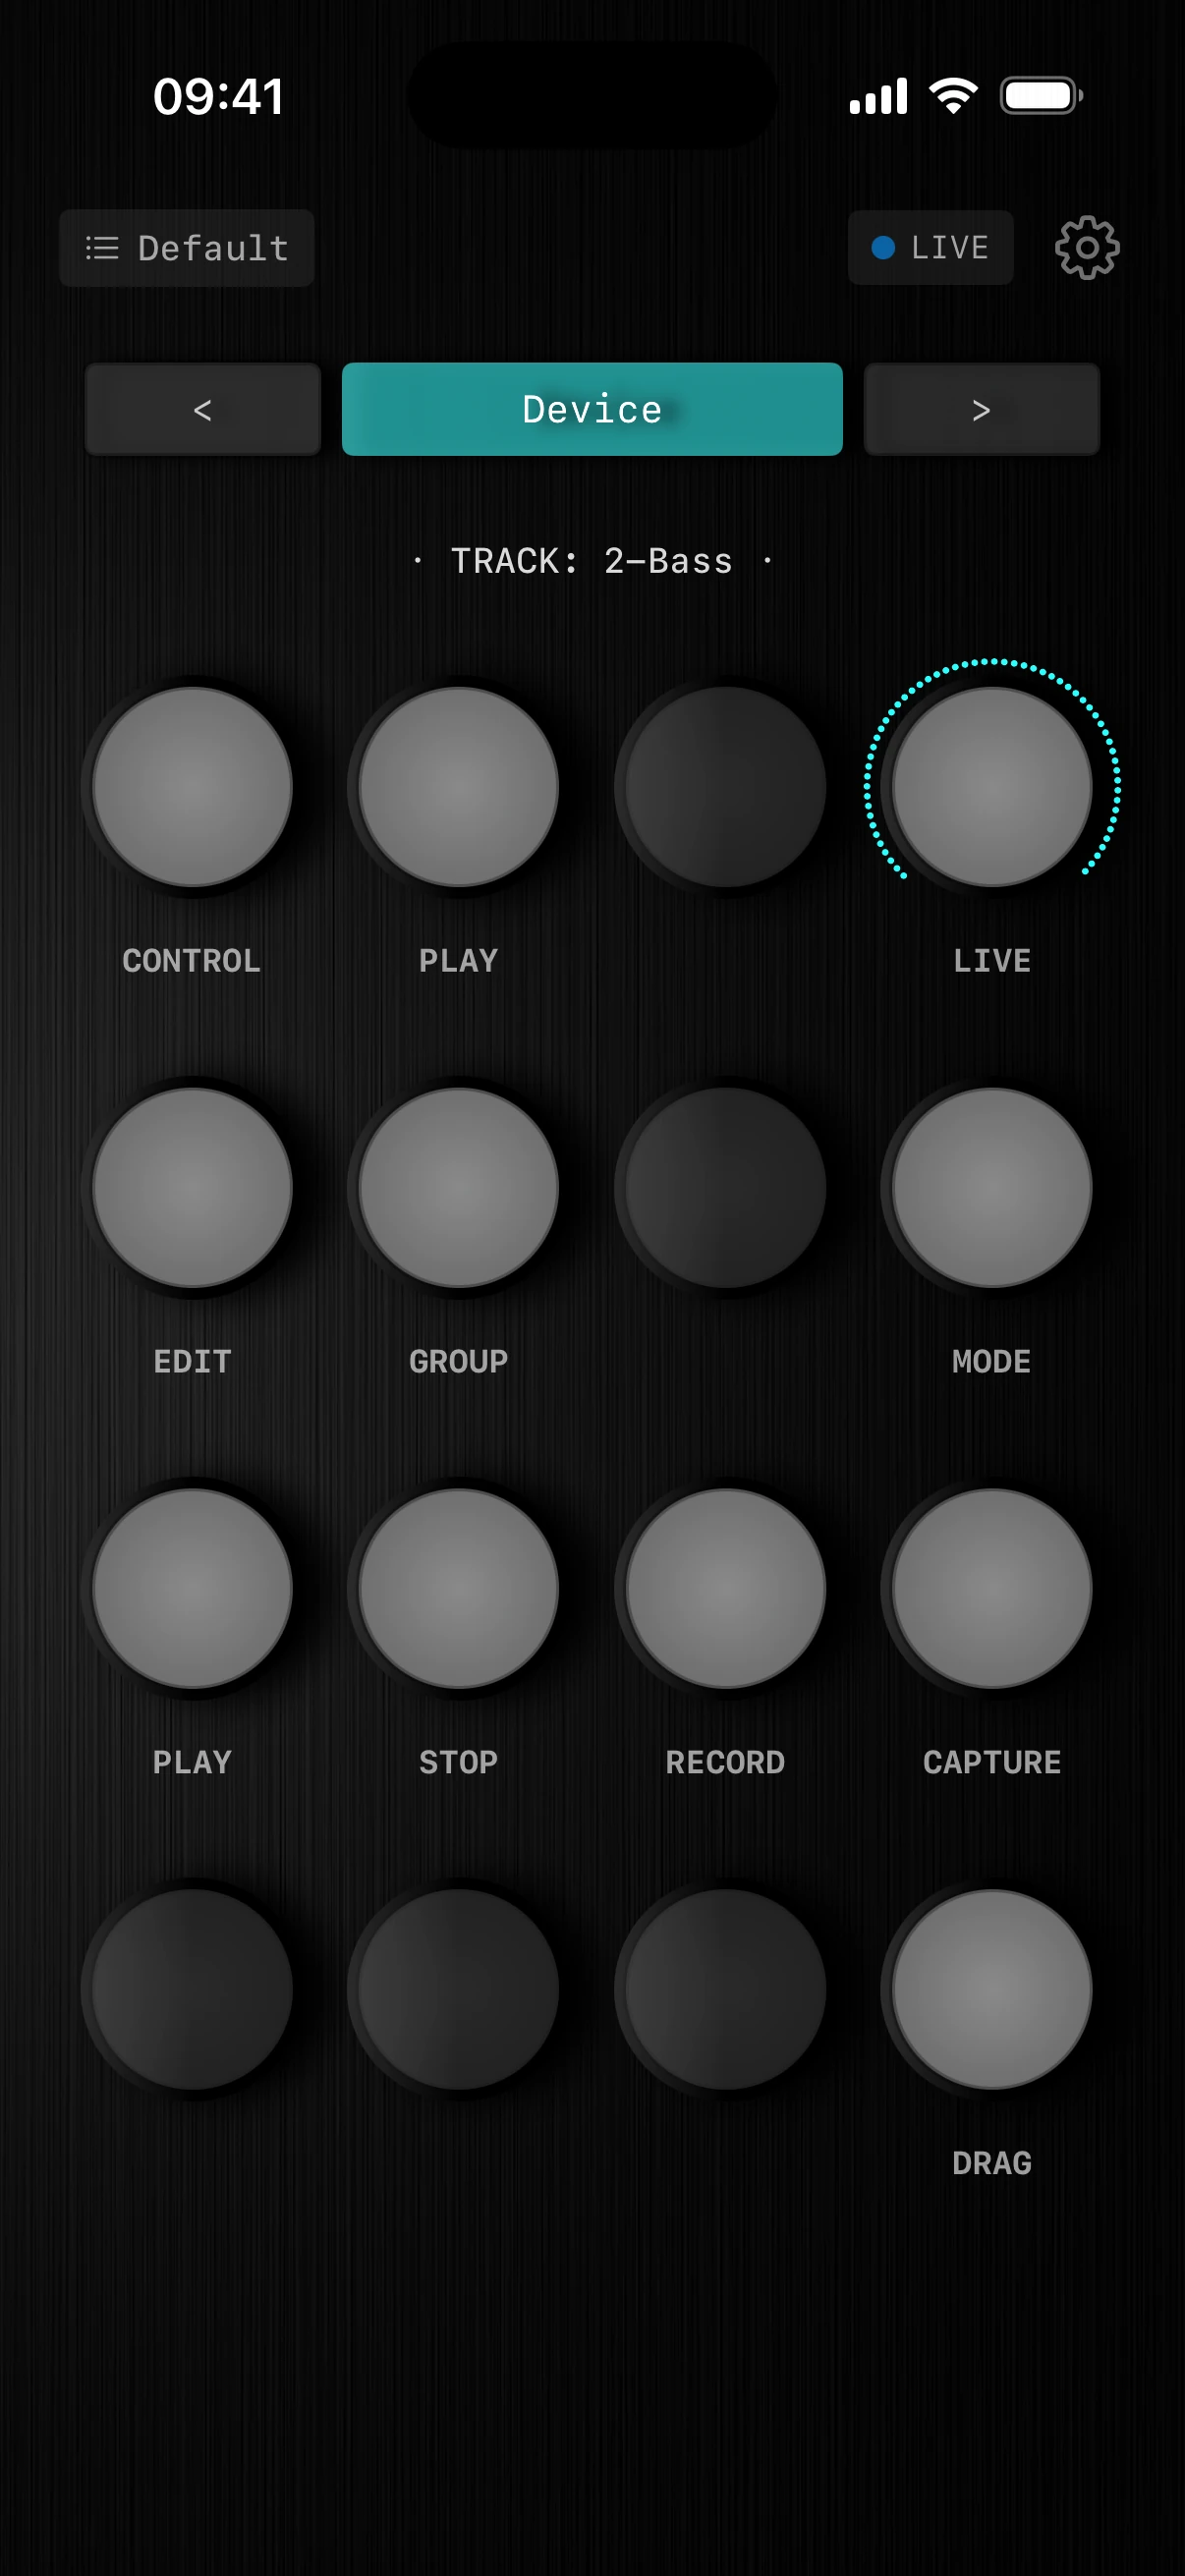
Connect Live. Mode Select grows.
With the Knob16 Ableton script connected, Mode Select also reveals Live mode and transport for your set.
TIPBank 4 in Control mirrors Live mode automatically. If Live mode is set to Device, bank 4 shows the device selected in Ableton Live. The bank and Live layout now have different colors.
- 01Live statusKnow when Live is following
When the Ableton script is detected, the green MIDI indicator turns blue and reads LIVE.
- 02Live layout barThe bar names the current Live layout
Cyan marks Live mode. Instead of a bank number, the bar shows Device, a mixer layout, or a macro layout.
- 03LiveBring the current Live set to the surface
Follow Ableton devices, mixer channels, or Rack macros.
- 04ModeChoose the Live layout
Opens Device, Mixer, and Macros — see the next sheets.
- 05Transport · PlayStart without reaching for the computer
Start Live’s transport from the phone.
- 06Transport · StopStop from the same surface
Stop Live’s transport immediately.
- 07RecordRecord while your hands stay in place
Arm Live’s recording without leaving the instrument.
- 08Capture MIDIKeep the idea you did not record
Live’s Capture MIDI recovers what you just played, even if recording was off.
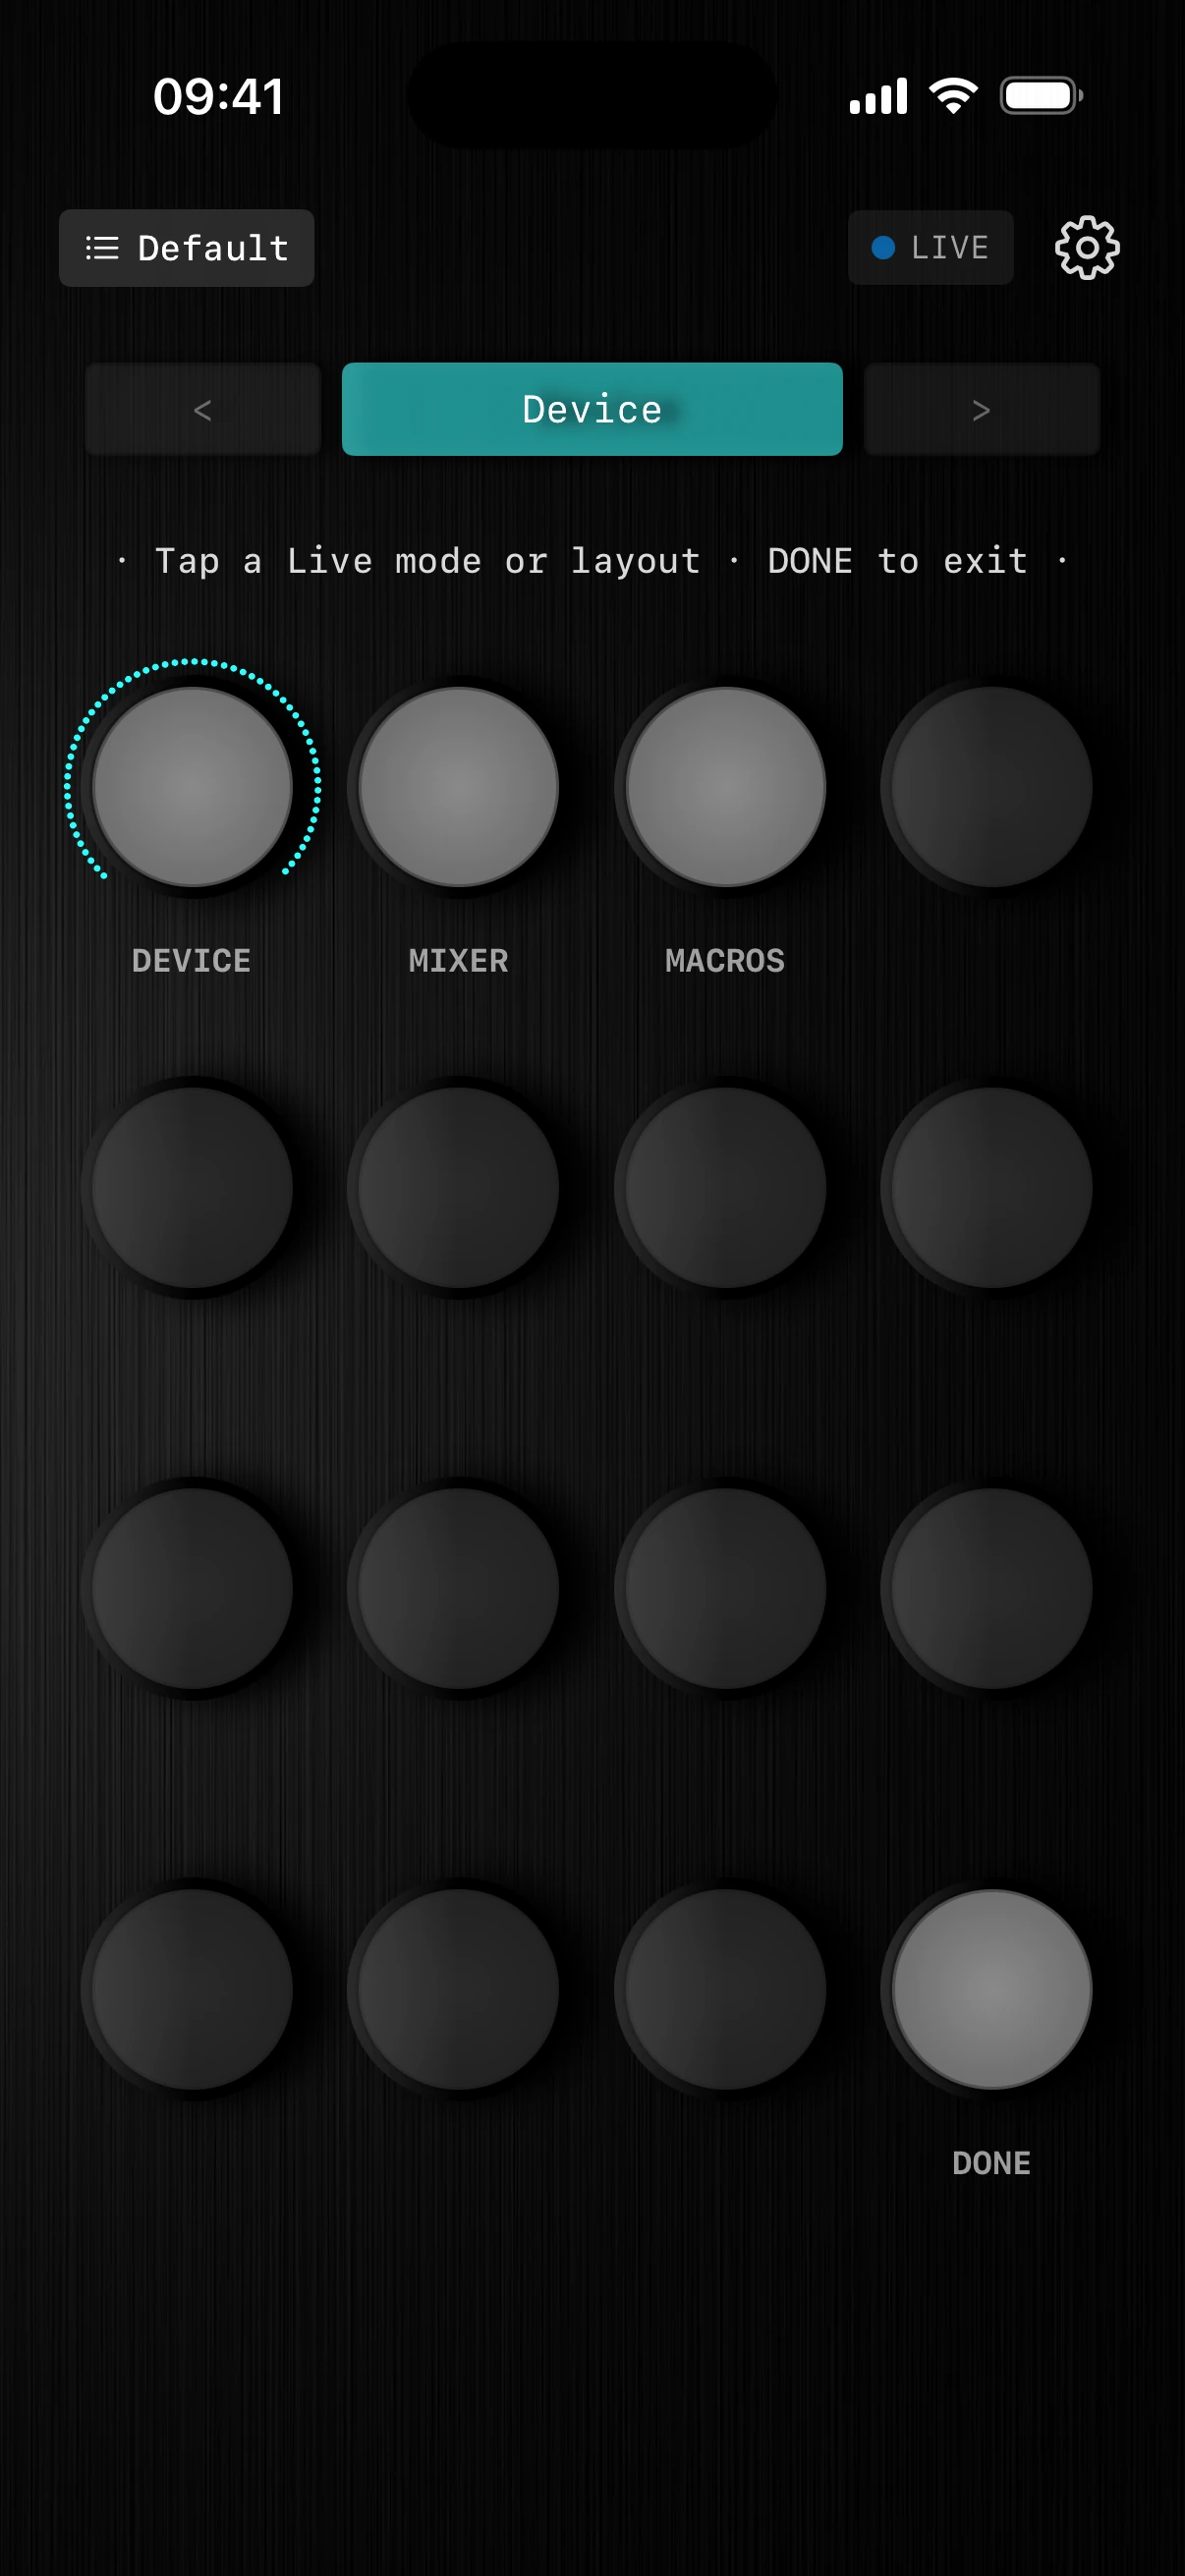
Follow the device you are shaping.
Device mode puts the device selected in Live on the surface — Ableton’s Blue Hand, on your iPhone.
- 01‹ ›previous / next device
- 02SHIFT + ‹ ›previous / next track
- 01Arrows ‹ ›Step through devices
In Device mode, the arrows switch which device on the track is shown on the surface.
- 02Shift + arrowsChange the track
Hold Shift and tap an arrow to move to another track — device selection moves with it.
- 03DeviceBlue Hand under your fingers
The surface follows the device selected in Live.
- 04MixerLevels, pans, and sends
Seven mixer layouts — next sheet.
- 05MacrosRack macros across tracks
Four grid shapes — see the macros sheet.
- 06DoneBack to the surface
Return to Live control with the chosen layout.
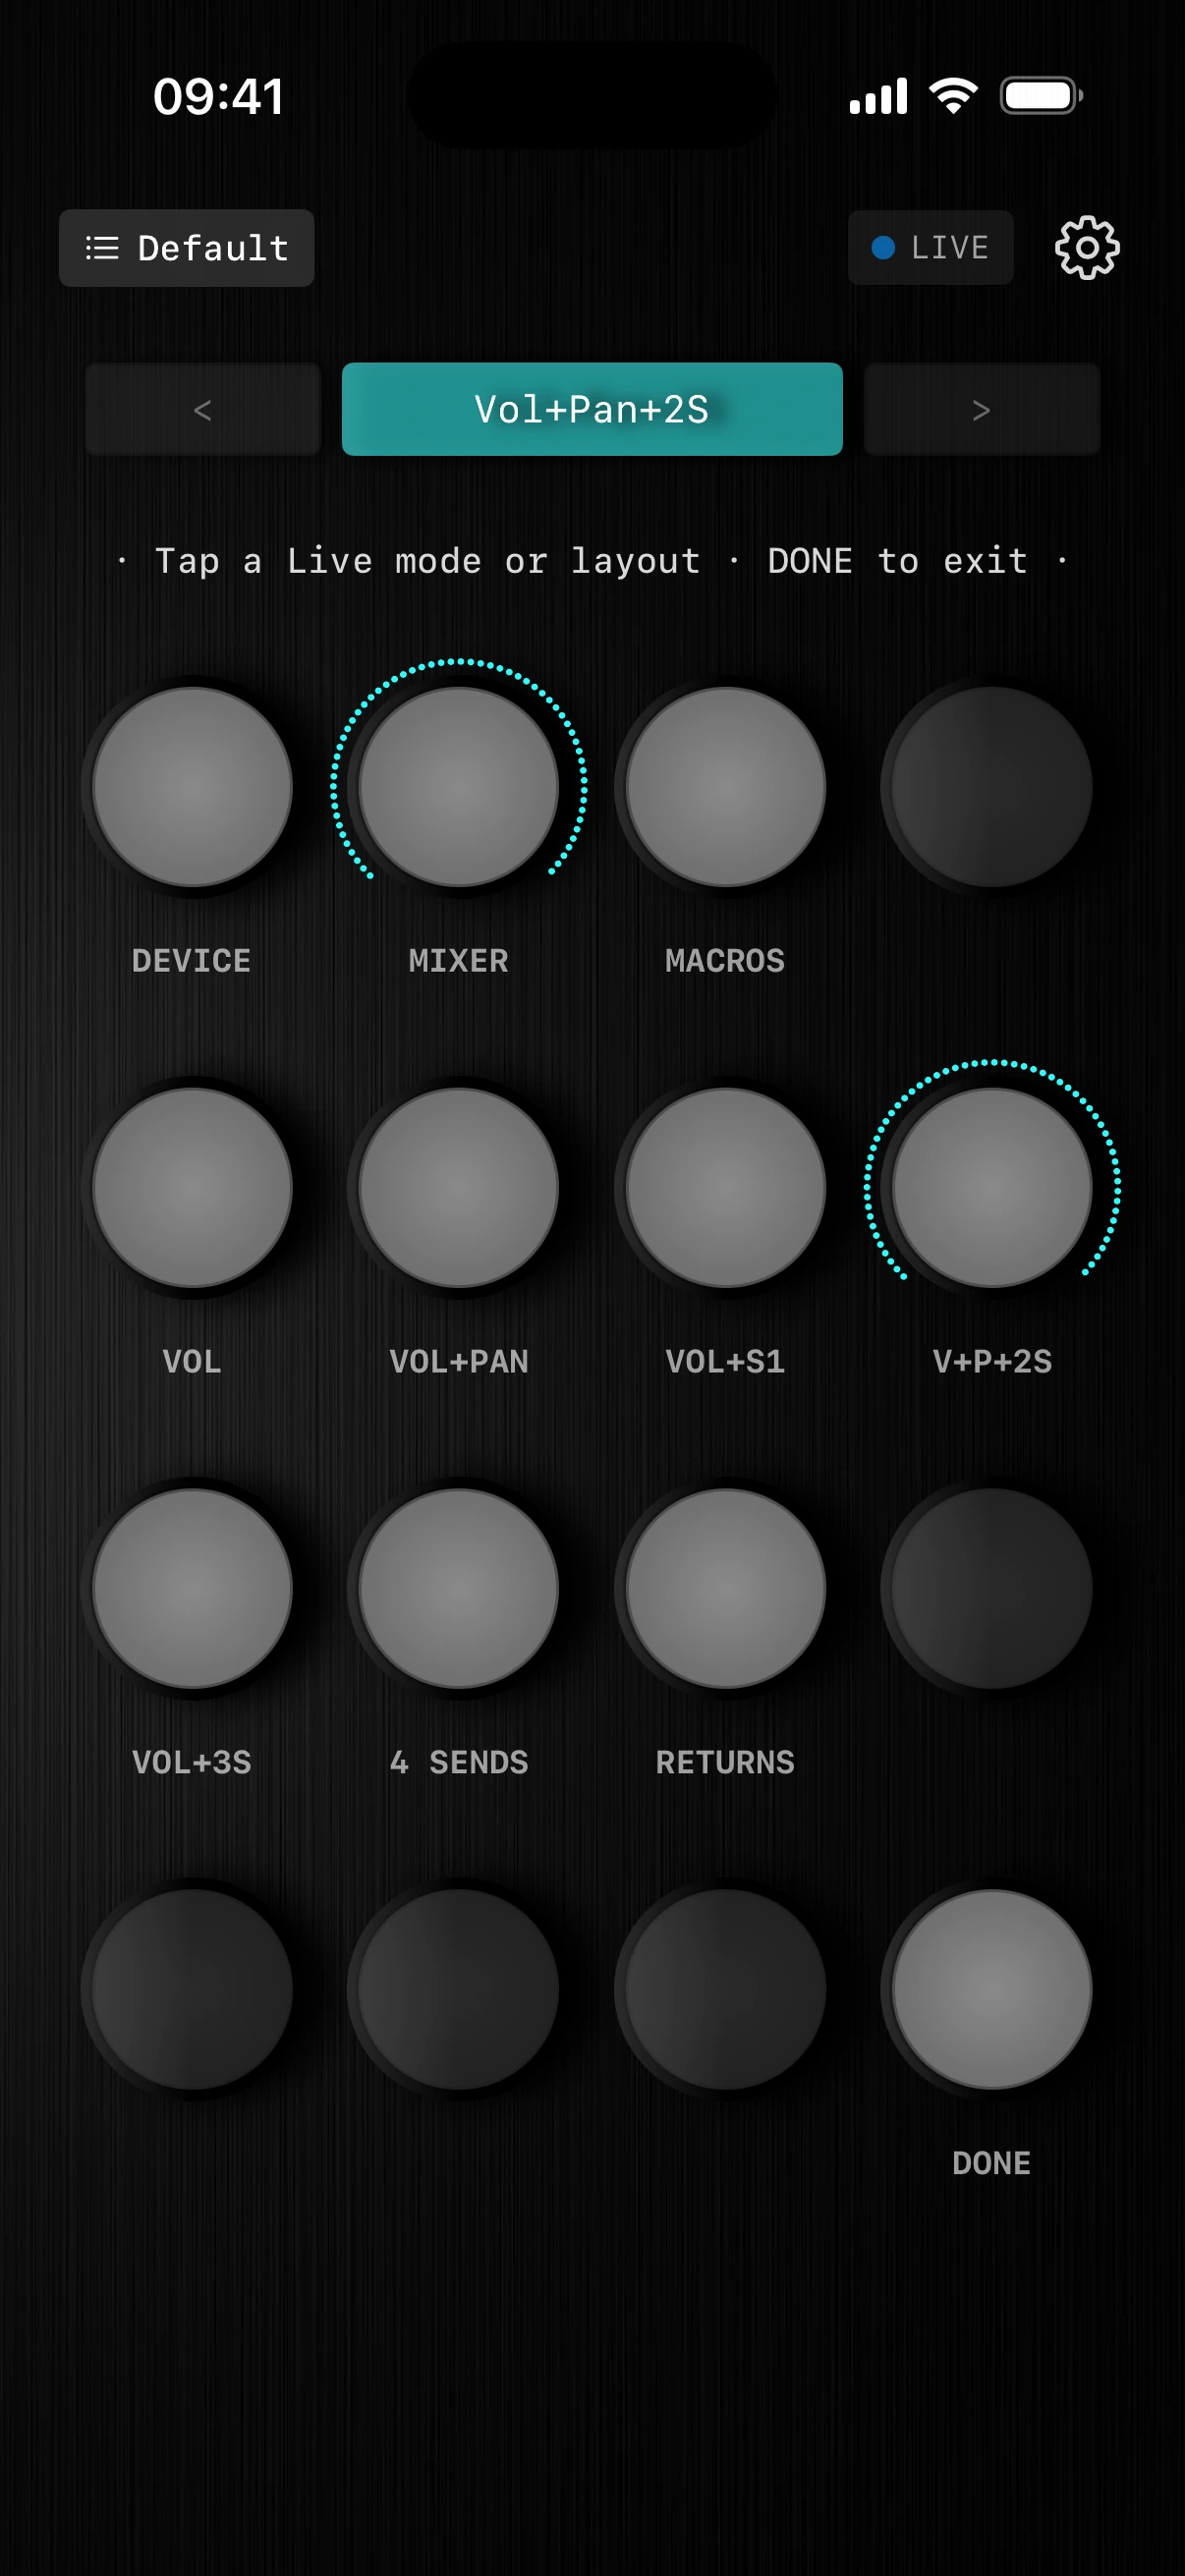
Pick the mixer you need.
Seven layouts for levels, panning, sends, and returns. Shift shows the one in use.
- 01Layout nameAlways know the current layout
The bar reads the layout in use — Vol+Pan+2S here.
- 02VOLRide levels only
Every knob controls a track’s volume.
- 03VOL+PANBalance and place
Volume and pan for each track.
- 04VOL+S1Level plus one effect send
Volume and the first send for each track.
- 05V+P+2SA compact channel strip
Volume, pan, and two sends per track.
- 06VOL+3SLevel and three sends
Volume and the first three sends per track.
- 074 SENDSSends only
Four sends per track, for effect-heavy mixing.
- 08RETURNSMix the return tracks
Put Live’s return tracks on the surface.
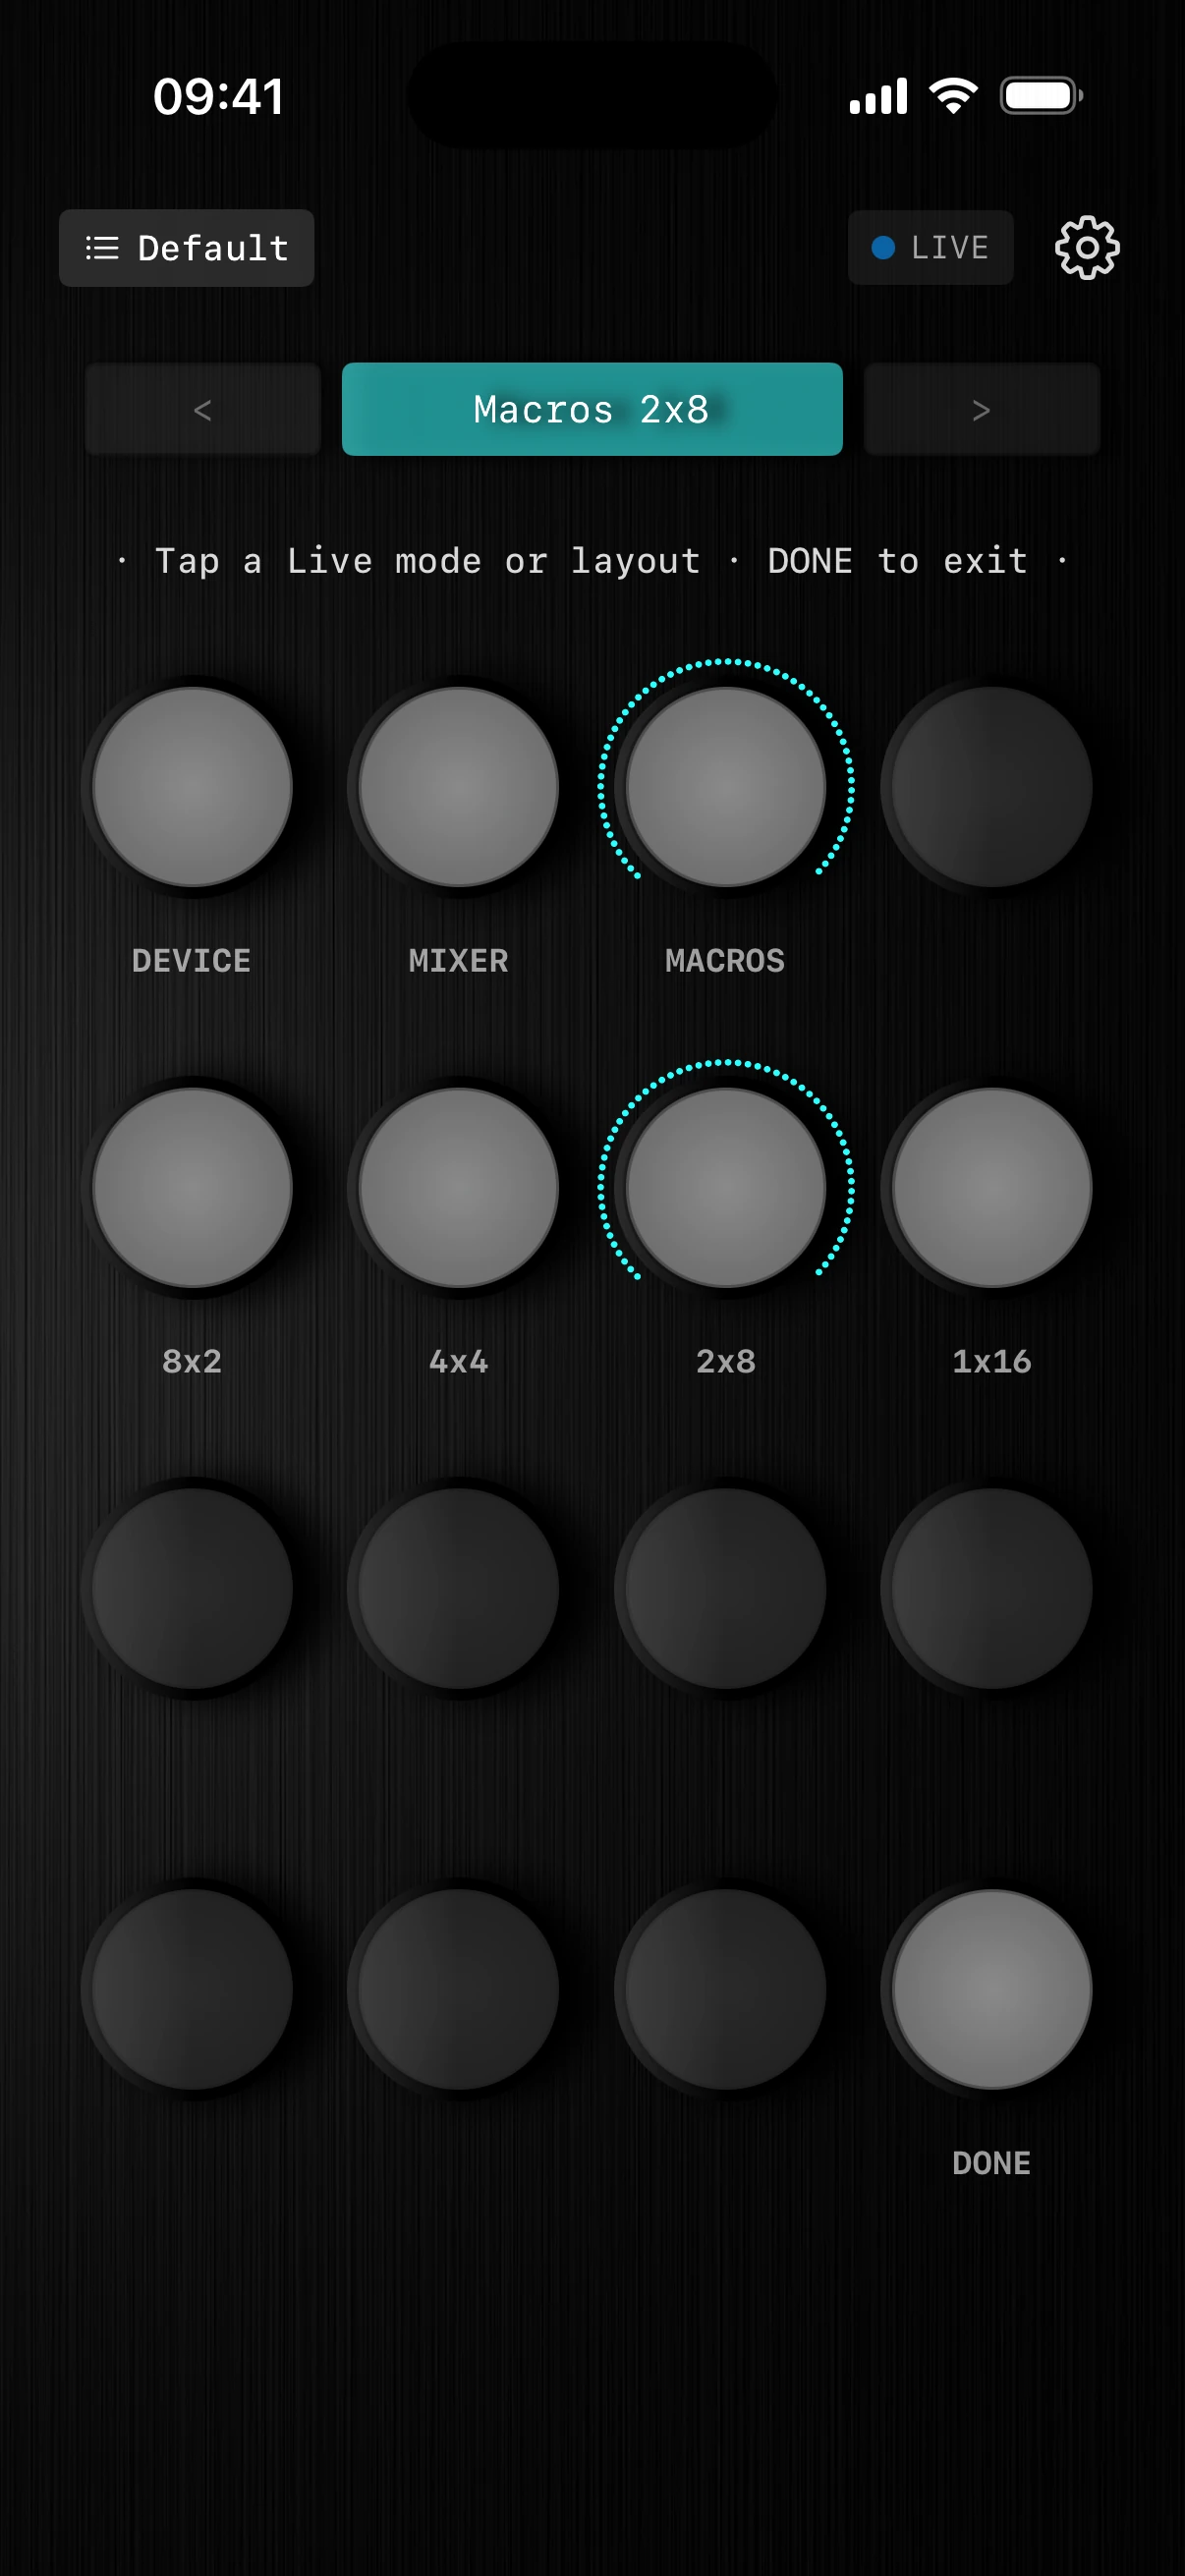
Macros, laid out your way.
Rack macros across tracks in four grid shapes: tracks × parameters.
- 01Layout nameThe grid shape at a glance
The bar reads the layout in use — Macros 2x8 here.
- 028×2Eight tracks, two macros each
Wide view: a couple of key macros across many tracks.
- 034×4Four tracks, four macros each
A balanced grid — one row per track.
- 042×8Two tracks, eight macros each
Go deeper on a pair of tracks.
- 051×16One track, sixteen macros
Every macro of a single track under your fingers.
Learn it once.
Play it everywhere.
Knob16 turns your iPhone into a control surface you can read at a glance.
Get Knob16